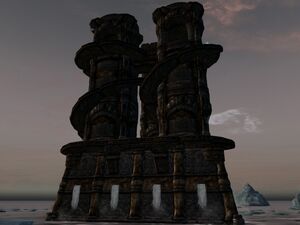
Itnamzand is a large Dwemer ruin northwest of Solstheim, close to Northshore Landing, which is north-northeast of Bristleback Cave.
The dungeon contains Tektites, Dwemer automata, Chilfos, Stals, Darknuts, Gimos, and Hylian Ghosts. The main treasure of the dungeon is a Noble Sword, protected by the Ancient Automaton. The dungeon also contains the Magic Sword, two Tarnished Shards, Gold Dust, Goron weapons, a Command Daedra Spell Tome, enchanted weaponry and other loot.
The dungeon features an intact upper level, and a twisted lower level.
The remains of a failed adventuring party can be found inside, with the journals of the party's mage scattered through the dungeon.
The dungeon connects to the Link Between Worlds.
Walkthrough
Entering
In order to get to Itnamzand, walk north from Bristleback Cave. The dungeon will be protruding from the sea. Before entering, walk east to find Northshore Landing. On the east side of the landing will be a damaged wooden shack. Walk into the shack to find a pink fairy floating above Arefal’s Journal - Volume 1, which is sitting on a table. Swim to the north side of Itnamzand and dive underwater to find a large Dwemer door. Enter the door to venture into Itnamzand Siphon.
Itnamzand Siphon
When you enter, you will be underwater in a large, flooded room. Swim to the northwest corner of the room to discover a large pipe. Walk up the pipe to find a junction of pipes with an inclined pipe at the northeast corner of the room. Walk up the pipe to find a grid of pipes and a set of stone stairs leading to a door. Walk across the pipes and up the stairs to find Arefal’s Journal - Volume 2. Enter the door to go to Itnamzand’s exterior.
Itnamzand Exterior
When you arrive, you will be facing an empty brazier to the south. Travel to the main roof of structure by going up either the eastern tower, where you will be greeted by four Chilfos, or the western tower, where you will be greeted by a single Tektite and three Chilfos. Search for a lever in between the central building and the northern tower. Pull it to lower two southern ramps that allow for easy access back to the dungeon. Travel to the top of the eastern tower to find a Chilfos guarding a valve situated on the northeastern pillar. Turn the valve to lower two ramps that form a bridge in between the eastern and western towers. Travel across the bridge to the top of the western tower, where a Chilfos guards a valve situated on the northwestern pillar. Turn the valve to lower a large ramp that forms a bridge to the northern tower. Walk across the bridge and pull the central lever to descend into Itnamzand.
Itnamzand
When you arrive, you will be in a hallway facing a door to the north. Open the door to find a large room filled with eleven Tektites. Pull a lever on the northwest side of the room to lower a ramp that leads to another door. Below the ramp lies a chest containing leveled loot. Go through the doors to find yourself in a grand room with a northern lever-activated door guarded by two Tektites and two Dwarven Spheres. Travel through a southwestern gate to find a passage with a Chilfos protecting two chests containing leveled loot and a lever on a northern wall. Pull the lever to open the northern door in the grand room. Walk through the door to find a passage leading to another door. Open the door to find an Ice Gimos guarding a case of stairs. Walk down the stairs to find Arefal’s Journal - Volume 3 next to the body of Pandora, guarded by three Tektites, a Lesser Poe, and a Dwemer Centurion. On the north side of the room lies an alcove with two levers and a lever-activated door. Pull the eastern lever to open the door. If the western lever is pulled, Dwarven Spheres will come to attack the player. Travel through the door to be greeted by a Greater Darknut and two Chilfos. Walk to the northeastern corner to find a passage to another room guarded by an Ice Gimos. Pull the lever in a western alcove to lower a ramp in a passage north of the room containing the Greater Darknut. Below the ramp lies a chest containing leveled loot. Travel up to the ramp to find a Chilfos standing over an expired Broken Dwemer Sphere. Walk east until you find a southern platform overlooked by a statue. Jump to the platform to find a Skyloft Iron Shield, an Ashland Goron Tunic, a Goron’s Cap, a Zora Circlet, and a chest containing leveled loot. The statue overlooking the platform will activate and become a Fire Gimos. Jump back onto the northern floor and walk east to find a door. Activate the door to travel to Itnamzand Deep.
Itnamzand Deep
When you enter, you will be in a small cave with a hole in the floor. Jump down the hole to find a large, sideways, flooded room. Dive into the water to find a passage partially illuminated by a blue light. Swim down the passage to find the corpse of Turol and another passage that leads into a cave, also illuminated by a blue light. Swim up towards the surface to find a northern passage into another small cave. The cave contains two Armos guarding a Hylian Shield and a Burdened Coffin containing a Forgotten Sword, a Ring of Ikana, a Tarnished Shard, and Shard Note 22 of 24. Swim back out of the passages and return to the main room. Swim to the south side of the room to find a ramp out of the water protected by two Tektites and a Flaming Stal. Travel up a series of broken pillars to the west to find a platform. On the east side of the platform lies a chest containing leveled loot. Walk up a northern pillar followed by a pipe facing east to find a platform on which the corpse of Zulema and a Dwarven Centurion can be found. A chest on the north side of the room contains a Knight’s Crest along with some leveled loot. Use Whirlwind Sprint to access a sideways southern staircase on which a Wind Gimos resides. Jump down to a southwestern platform to find a chest containing leveled loot and an Ancient Chest containing the Magic Sword and various leveled pieces of loot. Drop down to the western platform below and walk back to the surface of the water. Walk to the southern room to find Arefal’s Journal - Volume 4 underneath a fallen chandelier. Continue south to come across a door. Open the door to find a Flaming Stal guarding the entrance to an inverted hallway leading south, with small passages to the east and west. At the end of the passage to the west lies a chest containing leveled loot. Continue walking south to find a slightly flooded series of passages comprised of the ceiling of a Dwemer room. Four Tektites, a Flaming Stal, and a Phantom guard the junction between the southern, western, and eastern passages. At the end of the eastern passage lies a chest containing leveled loot. At the end of the western passage lies a door that leads to a chest containing leveled loot. Walk along the southern passage to find a door above a pile of rubble. Open the door to reveal a Lesser Poe guarding the entrance to a system of hallways. Follow the hallways south to find a Parutamu guarding an Ebony Ore Vein. Walk west to find a Twili Sword obscured by boulders. Continue along the western passage to find a long, clean, uninverted Dwemer hallway. Walk south to discover a room guarded by two Wind Gimos, a Hylian Vampire, and a Dark Interloper. On the east side of the room lies a Moon Shard, a Grey Gem, a Goron Quarterstaff, Recipes for the Ancient Enchanters, and a Hardy Strong Box containing both a Tarnished Shard and Shard Note 5 of 24. Additionally, the east side of the room contains an anvil, an arcane enchanter, and multiple enchanted weapons. On the west side of the room lies a sample of Gold Dust, Sand of Hours, Black Tektite Jelly, Green Tektite Jelly, two Eye of Wolfos, and the corpse of Arefal, which contains Arefal’s Journal - Volume 5. Additionally, the west side of the room contains an alchemy lab, multiple books, a spell tome of command daedra, and three chests containing leveled loot. Walk south to find a door protected by Beamos. Open the door to discover that the room in which the Ancient Automaton resides is closed off by a gate. Pull an eastern lever to open the gate. In the center of the room lies the corpse of Sudene. On the southern side of the room lies a set of stone stairs that lead up to a door. Enter the door using the Itnamzand Sanctum Key dropped by the Ancient Automaton to enter Itnamzand Sanctum.
Itnamzand Sanctum
When you enter, you will be facing a Noble Sword resting in its pedestal. On the east side of the room lies a locked gate that can only be opened by playing the Song of Time. Beyond the gate resides the Light of Knowledge and a Fairy in a Jar (Yellow), as well as an entrance to A Link Between Worlds. Enter the southern door to reveal an elevator shaft. Pull the lever to travel back to Itnamzand.
Exiting
When you arrive, you will be facing a locked door. Unlock the door using the Itnamzand Sanctum Key. Walk down the southern passage to find another elevator shaft. Pull the lever to exit to the exterior of Itnamzand.
Lore
Itnamzand was built by Dwemer inhabiting Solstheim to seal away the Noble Sword and entrance to the Link Between Worlds. The dungeon was designed to sink into the sea, and the mechanism used to sink the entrance to the dungeon was utilized before the disappearance of the Dwemer. The dungeon is built on an unstable portion of Solstheim's shore, and like Kinolangdanzel, its underground rooms have been twisted and moved by geologic forces. Itnamzand was subjected to folding moreso than faulting. This folding ultimately broke the mechanism keeping the dungeon under water, resulting in the dungeon rising from the sea some time in the early part of the Dragonborn's quest.
The Dwemer of Itnamzand fortified the portal to the Link Between Worlds, adding a lift to ease entry. They also constructed mechanical bridges in the Link Between Worlds, and had plans to continue construction. However, their plans were cut short by the disappearance of their race.
Background and Inspiration
Itnamzand was added to Relics of Hyrule in version 5.0 of the mod. It was built to provide a third dungeon to the mod and to complete a geographic triangle with Kinolangdanzel and Morwitijaal. The Noble Sword was added to give the dungeon a final treasure.
The exterior of Itnamzand was included in an earlier update, but it was not until 5.0 that its interior was accessible.
In version 6.3, the exterior of the dungeon was redesigned from scratch, and the interior was updated to give a more "lived-in" atmosphere. The redesign of the exterior was done to further distinguish it from Kinolangdanzel (avoiding a "Kinolangdanzel with three towers" look,) to make it more architecturally logical and consistent with other Dwemer ruins, to make it look less skinny and "clumped," and to fix an issue with the exterior not loading properly. JKalenad is very proud of the redesign.
Itnamzand was originally much larger and featured elements of what became the Ruptured Towers and Ganon's Deadlands.
Itnamzand draws inspiration from the atmosphere of Twilight Princess, and is intended to pay tribute to that game. Its upside-down portion was influenced by Stone Tower Temple from Majora's Mask while its emergence from the sea is reminiscent of Woodfall Temple and the Tower of the Gods. Itnamzand was also influenced by Kagrenzel. Itnamzand is essentially an answer to the question, "what if Kagrenzel was entirely Dwemer?"
The name "Itnamzand" is an anagram of "Midna" and "Zant."
Gallery

Itnamzand's exterior prior to 6.3

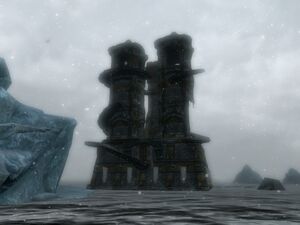
Another view of Itnamzand prior to 6.3. Note the missing wall on the right-most tower.
Video

Itnamzand Trailer - Relics of Hyrule 5.0

Itnamzand Walkthrough - Relics of Hyrule Video Guide

Relics of Hyrule- The Series Episode 47 - Itnamzand
